Booking Widget Form
The "Good Journey Widget Form" is a versatile web application that seamlessly integrates with your website, enhancing user search and booking capabilities without compromising your site's aesthetics. It's lightweight, mobile-friendly, and fully customizable to match your brand's colors and theme. Keep in mind that prior web development experience is required for installation.
Note:
- Once you finish installing the widget please contact
support@goodjourney.io to whitelist your domain name.
- Make sure that your site has a font assigned for the body/html tag. Missing this will cause the widget to have no font on mobile views.
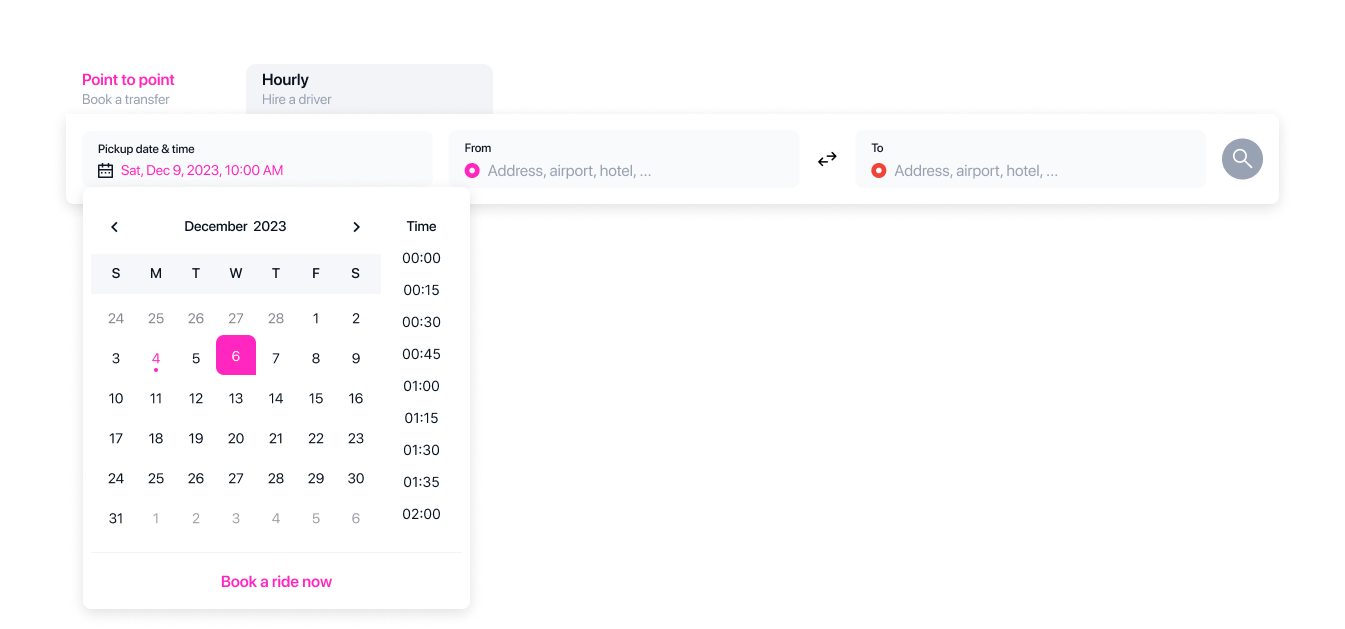
The widget form comes in two modes:
- Full mode
- Compact mode
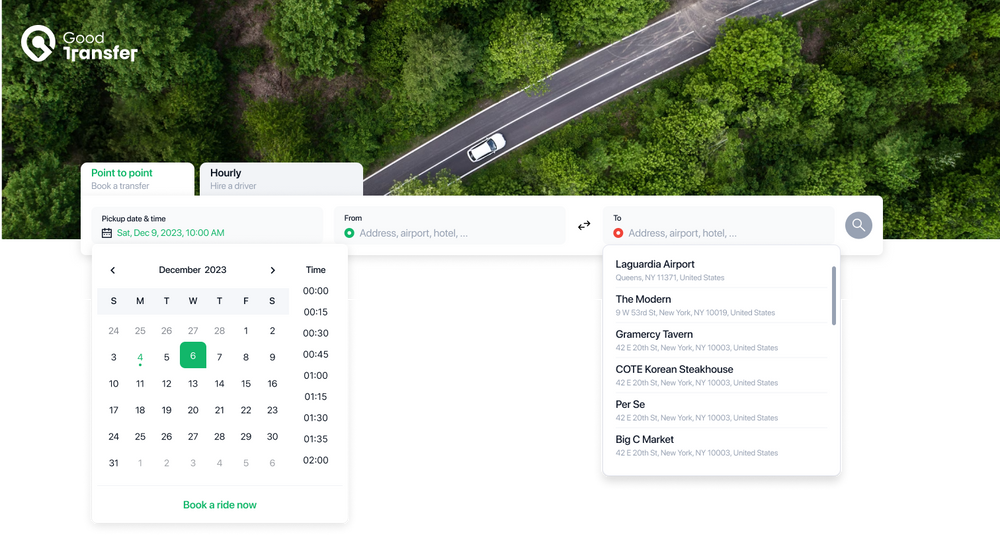
Full Mode
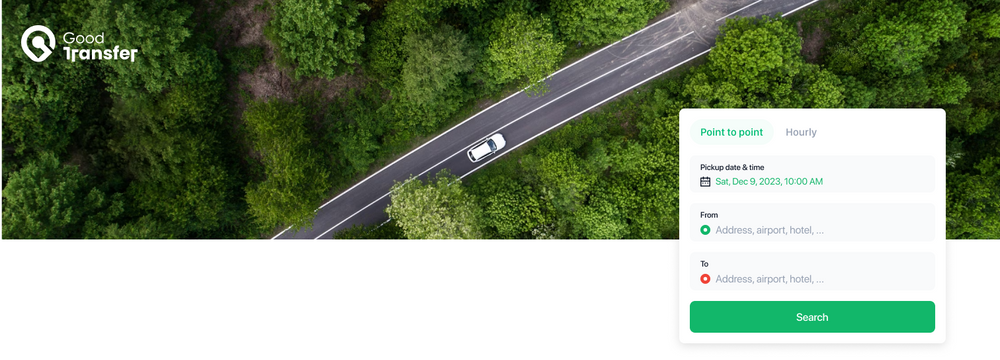
Compact mode
Getting Started - Fleet Token
Before you get started you need to know your fleet token . To find this token you need to go to your command center dashboard and navigate to Settings > PWA. As shown below:
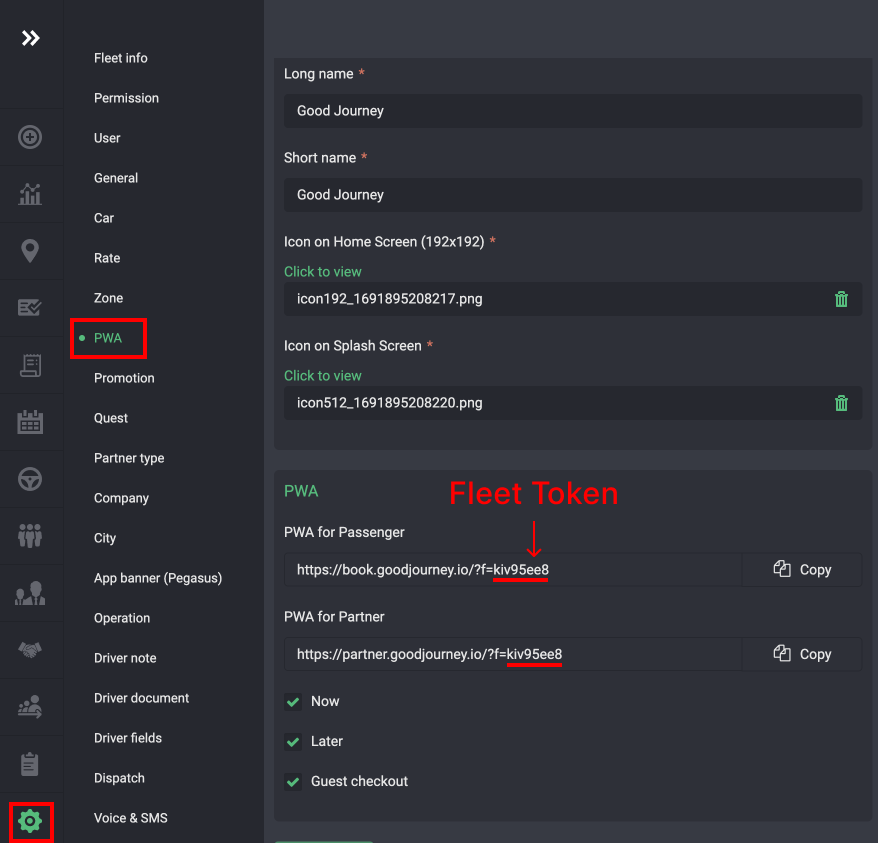
In the example above the fleet token is kiv95ee8
1. Adding Head Script Tags
To integrate the widget, begin by adding the following code snippet within the <head> section of your HTML:
<script>
function initGJBookingForm() {
	window.GJBookingWidget.init({
		fleetToken: 'REPLACE_WITH_FLEET_TOKEN'
	});
}
</script>
<script defer="defer" src="https://widget.goodjourney.io/js/widget.js"></script>
Ensure that you replace REPLACE_WITH_FLEET_TOKEN with your own fleet token. This code initializes the booking form when your webpage loads.
2. Specify the Widget Placement
Next, decide where you want the widget to appear on your website. By default, it should be placed within a <div> with the ID gojo-widget-container:
<div id="gojo-widget-container">
	<!-- The widget will be embedded here -->
</div>
You can use a different ID if necessary, but keep in mind that this may require additional configuration. Please refer to the Configuration section for further details.
With these two simple steps, you'll have our widget form seamlessly integrated into your website.
Configuration
The widget requires some configuration to function properly. You can also customize certain settings to tailor the widget to your specific needs. Refer to the table below for details:
| Name | Type | Require | Default | Description |
| fleetToken | String | Yes | The fleetToken is obtained from command center > settings > PWA | |
| mode | full or compact | No | full | The widget supports two view modes. full arranges components horizontally, while compact arranges them vertically. |
| root | String | No | gojo-widget-container | Use this key if you want to specify a different container ID instead of the default value. |
| partnerId | String | No | This key is used to collect commissions when the widget is embedded on a partner's website. | |
| locale | String | No | en-US | A string with a BCP 47 language tag. |
| localizationData | JSON | No | JSON object with key-value pairs for supporting multiple languages. | |
| color | JSON | no | Customize the default theme of the widget. Refer to the Customization section for more details. | |
| rtl | Boolean | No | false | Support RLT mode |
| latitude | Number | No | The default latitude value applied when searching for an address. | |
| longitude | Number | No | The default longitude value applied when searching for an address. | |
| pwaLink | String | No | The PWA link to which the widget will redirect after the user clicks the Search button. If not provided, the default will be your settings link or the GOJO PWA website.. Example: https://book.goodjourney.io/en-UK/ |
Ensure you configure these options to make the most out of the widget's functionality.
Initialization configuration example:
function initGJBookingForm() {
  window.GJBookingWidget.init({
    fleetToken: 'REPLACE_WITH_FLEET_TOKEN',
    root: 'gojo-widget-container',
  	mode: 'full',
  	partnerId: '123456789',
  	locale: 'en-US',
  	rtl: true,
  	latitude: 1.358604,
  	longitude: 103.9899436,
  	pwaLink: 'https://custom-pwa-domain.com/fr/', // this will preselect French
  	localizationData: {
  	  bookingTypePointToPoint: 'Point to Point',
  	  bookingTypePointToPointDescription: 'Book a transfer',
  	  bookingTypeHourly: 'Hourly',
  	  bookingTypeHourlyDescription: 'Hire a driver',
  	  dateInputLabel: 'Pickup date & time',
  	  pickupInputLabel: 'From',
  	  destinationInputLabel: 'To',
  	  pickupPlaceholder: 'Address, airport, hotel, ...',
  	  destinationPlaceholder: 'Address, airport, hotel, ...',
  	  search: 'Search',
  	  hourlyPackageLabel: 'Ride Duration',
  	  hourlyPackagePlaceholder: 'Select package',
  	  higherFareNote: 'Fares are higher due to high demand',
  	  upToDistance: 'Up to {{value}}{{unit}}',
  	  xMinutes: '{{value}} min',
  	  now: 'Now',
  	  ok: 'Ok',
  	  clear: 'Clear',
  	  time: 'Time',
  	  pickupRequiredMessage: 'Please select a pick up address first.',
    }
  });
}
Customization
The widget operates on the microfrontend concept, utilizing web components and native DOM elements rather than being embedded within an iframe. This approach allows for seamless customization by incorporating custom CSS directly from the target website.
Moreover, you can make use of a set of CSS root variables to define the widget's theme. This flexibility enables support for light and dark modes or ensures that the widget adheres to your design system.
Here are the default variables:
:root {
	--gj-color-primary: #12b76a;
    --gj-color-pickup-pin: #12b76a;
    --gj-color-drop-off-pin: #f04438;
    --gj-color-text: #101828;
    --gj-color-divide: #f2f4f7;
    /* Select options */
    --gj-color-item-title: #101828;
    --gj-color-item-hover: #f2f4f7;
    --gj-color-item-description: #98A2B3;
    /* tab bar */
    --gj-color-tab-bg: #f2f4f7;
    --gj-color-tab-title: #12b76a;
    --gj-color-tab-active-bg: #F79009;
    --gj-color-tab-compact-active-bg: #F79009;
    --gj-color-tab-active-title: #fff;
    /* container */
    --gj-widget-shadow: 0px 4px 16px 0px rgba(0, 0, 0, 0.12);
    --gj-color-widget-bg: #fff;
    /* form control */
    --gj-color-form-control-bg: #F79009;
    --gj-color-input: #113859;
    --gj-color-input-placeholder: #2E90FA;
    --gj-color-label: #09121f;
    /* buttons */
    --gj-color-button-disabled: #98a2b3;
    --gj-color-button-hover: red;
    --gj-color-button-bg: #000000;
    --gj-color-button: #fff;
    /* search buttons */
    --gj-color-search-button: #101828;
    --gj-color-search-button-bg: #FFEBAE;
    --gj-color-search-button-hover-bg: #0daa5f;
    /* date, times */
    --gj-color-date-selected: #F79009;
    --gj-color-date-selected-bg: blue;
}
There are two ways to change the themes:
- Configure from
GJBookingWidget.init() - Override the color variables via CSS
Configure from GJBookingWidget.init()
Change theme example:
function initGJBookingForm() {
  window.GJBookingWidget.init({
    fleetToken: 'REPLACE_WITH_FLEET_TOKEN',
    root: 'gojo-widget-container',
  	mode: 'full',
  	color: {
		'--gj-color-primary': '#FF27C0'
  	}
  );
}
After changing the primary color theme, it should look something like this:
If you want to change certain parts of the components and color behavior, please check out the Customization section.
Setup Dark Mode
To setup darkmode, you can add a new CSS to check user's device browser is set to dark mode and it will auto apply light or dark mode. Otherwise you can override or customize your CSS via the init.configure or override CSS. You can also add your own new CSS selector to our component to add the color directly.
For darkmode, only need to change variables by CSS:
@media (prefers-color-scheme: dark) {
  gojo-pwa-widget {
	--gj-color-primary: #fff;
  }
}
Sample Code to test
Here is some sample code for you to play with the configurations. You can add in your own fleetToken, configure and test the colors before integrating with your own website: